1 min read
Cosmetics Manufacturing Software: Inventory, Costing, Production
Cosmetics manufacturers have a lot more to manage than basic inventory and accounting. Products can involve ingredients, formulas, packaging, lots,...
4 min read
Your production floor is the backbone of your manufacturing business. The accounting or sales department can be a well-oiled machine on its own, but if the machining process isn’t well-oiled, your systems will grind to a halt. You can’t sell your produced goods if you can’t make them – and you can’t make them without insight into every other aspect of your business. A connected, adaptable, and intuitive ERP that unites all your various departments is the key to keeping items moving through production and into customers’ hands.
Acumatica, naturally, is that unifying force. The cloud ERP allows business owners to obtain a clear picture of their company and all its moving parts. From the performance of their eCommerce site, to the delays happening in shipping/receiving, to the missing components of an assembly that need re-ordering: Acumatica is a single source of the company’s truth.
This blog will take a walk through the process of:
And more. Download the Acumatica Production Management datasheet to all of the features in list form.
First start by navigating to the Production Order screen (hopefully you have it favorited!) The Production Orders screen lists all of the various production orders, whether they are still in planning or already in process.
This example will use a lavender body lotion
First, add a new record under production orders. Search for your item, and give it a description. Now you need to fill out a few details for your order:
%20copy.webp?width=672&height=552&name=Acumatica%20Production%20Management%20%20(2)%20copy.webp)
Once you’ve filled those out, save the order.
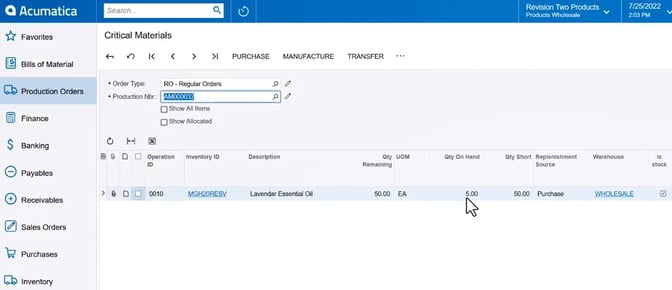
The Additional Detail menu is under the ellipsis; here you can look at the critical materials that are required in order to complete this specific order. In this example, there isn’t enough of the lavender essential oil in order to complete this specific production order (it needs 50 to complete the order and there is only 5 on hand).
You can now create a purchase order for this replenishment item directly from this screen, using the default vendor for this specific item. You can do a look-up and update the vendor here, if necessary, as well. Click “Create.”
If you navigate now to the Purchase Order screen, you can make any required updates or instructions for the purchase order. If a user tries to remove it from hold, it will only do so if the user has appropriate permissions.
Acumatica has several approval map options that can be added anywhere there needs to be extra eyes on a process. For example, a map created in Purchase Orders will not release a PO until it is approved.
You can look on the Approvals tab and see who the approval has been assigned to, as well as the status of the approval.

This is also an optional setting, but you have the ability to email directly from the system to the vendor. When you print the PO, it will open up the actual purchase order form. Simple review the order, decide that this is what you'd like to send to your vendor, then simply click Send. It will bring up an email editor, and at this stage you can create a customized message to your vendor, or simply utilize the template that you've created for purchase orders.
After you’ve sent it, you’ll see that there is now an activity associated with the purchase order, which is that email that you just sent. Other users will be able to come in and see the email that was sent to your vendor, as well as the purchase order attachment that was provided.
Let’s suppose that you've sent the purchase order, the items arrived, and you're ready to receive them.
Start by clicking “Enter Purchase Order Receipt.” This will take you to your Receiving screen. Acumatica has the ability to establish a one- or two-step receiving process here. You can create a bill at the same time as the receipt, if you receive the bill with the actual items. Or you can simply receive the items, and create the bill later. You do this by unchecking “Create Bill.”
%20copy.webp?width=769&height=420&name=Acumatica%20Production%20Management%20%20(5)%20copy.webp)
When you enter it, the receipt will default the total order quantity. However, if you've under-received, you can simply change this.
Oftentimes, cosmetic manufacturers are also going to be applying landed costs to their received items. The way to do this is to click on our “More Actions” and select “Enter Landed Costs.”
This will take you to the Landed Cost Entry screen. Select a landed cost vendor, a landed cost code, (Shipping, Duty, Customs, other types of transportation, etc.). Then hit “Apply.”
Now, on the Details tab, you'll see that purchase receipt has the landed costs allocated to it.
Then you can quickly create a Landed Cost Bill here by checking “Create Bill” and then giving it an invoice number. Remove the hold from the document, release it, and the landed cost has been applied.
All of the related documents within Acumatica are completely linked. If you navigate to the Landed Cost tab, you can also review the order. Once the bill has been set, it will also appear on the Billing tab.
Now that you've purchased the required products to complete the production, go back and complete your production order. Release the order and review your Totals tab.
This Totals tab is nifty. It displays:

Now that the production order has been placed into production, you have the opportunity to issue materials and labor directly, if necessary. You can backflush materials and labor, or create a move transaction (which moves items from raw materials inventory into the finished good, and applies any necessary labor).
Now you can simply go to the final operation, which will complete the process. Select the quantity to produce, remove the transaction from hold, and simply click “Release.”
Once the transaction has completed, the Totals tab will refresh with the actual totals. Whether labor was at, above, or under the cost that you estimated; materials are what you expected, total variance, and the total manufactured item that's going into inventory.
Now you have everything you need to get selling and ship your items!

1 min read
Cosmetics manufacturers have a lot more to manage than basic inventory and accounting. Products can involve ingredients, formulas, packaging, lots,...
1 min read
Your data is only as good as the tools you use to analyze it. What is the point of investing in a modern cloud-based ERP system if you can’t make...

1 min read
In the construction industry, project management is the backbone of success—but it’s only one piece of a construction business. You also need control...